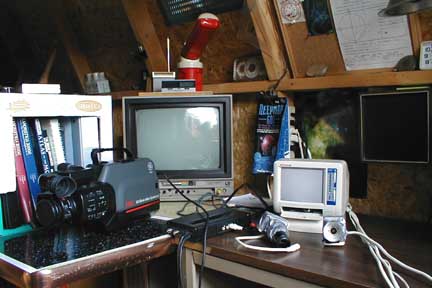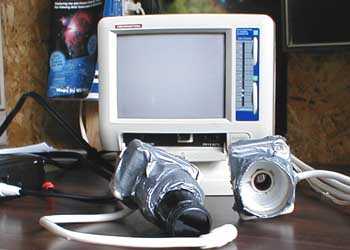
It's the first clear night of winter.

The First Quarter Moon shines in the southern sky.
The planets Jupiter and Saturn appear brilliant to the naked-eye.
Your telescope hops from one spectacular solar system view to another.
You would love to somehow capture this evening. . . .

And you can, by ASTRO VIDEOGRAPHY!!!

Taking astro videos is simple, inexpensive, and fun.
You don't need to be a TV cameraman to make films or capture images of objects.

All you need is some basic video equipment,
which you may already have.


Benefits of video:
What Are the benefits of using video?

It allows you to observe in comfort and reduces eyestrain.
Great for group observing.
Allows you to manipulate real-time images.

Most video cameras capture and display about 30 images every second.
This short exposure time of video tend to overcome many of the rippling and churning effects
of our atmosphere. Video mimics the capability of the human eye-brain combination to cope with
the effects of atmospheric turbulence. It actually increases your visual acuity.
Viewing images on a monitor allows more detail to be seen when observing the Moon, Sun, and planets,
as opposed to direct thru the eyepiece visual observing.

Most people already have the basic video equipment needed.
(camcorder, VCR, and TV).
The camcorder can be handheld, or if the camcorder is light enough, it can be mounted directly
to the telescope.
Otherwise, a tripod will have to be used to hold the camcorder in line with the telescope eyepiece.
The image can then be either recorded directly by the camcorder, or output to a VCR.
Add a TV / Monitor for real-time viewing.
More advanced video equipment would consist of a video camera that can be attached to the telescope
replacing the eyepiece


Telescopes:
Video cameras can be used with any type of telescope.
(refractors, newtonians, SCT's , even small finderscopes, can be mounted as alt-az, dobs, clock driven).
Since video at the prime focus of a telescope will result in very high magnifications,
an equatorial mount driven electronically with a hand controller for adjustments is preferable.
A good finder with accurately aligned crosshairs is a must.
(should have a 8x50 or larger finder).
You will also need a barlow for increasing the image scale of the planets,
and may also need to use filters to decrease an object's brightness or to enhance faint surface detail.


Cameras:
Any camcorder can be used for recording astro videos.
The newer models are preferable due to their light weight.  Best results can be had with the
S-VHS and Hi8 versions. Look for camcorders that have low lux numbers (< 2),
and the ability to turn off auto focus and focus manually.

Many people are getting good results from home-made  video cameras.
These are usually made from PC Quickcams or home security type cameras.  (Supercircuts),
Security camera features to look for are removable lenses
(this allows them to be used at a telescope's prime focus), low lux numbers, high resolution,
manual shutter speed and gain control.  Black & White cameras are preferable because they have better
resolution, contrast, and light-sensitivity than color cameras.
B&W security cameras should have a lux rating less than 0.1 (average is about 0.05 lux).
Color security cameras generally have much higher lux ratings (average .5 to 1 lux).
A  B&W security camera rated at 0.05 lux mounted at the prime focus of a 8" SCT will show stars down
to about 10th magnitude.  Resolution (which is referred to as TV line resolution) is the ability of
the camera to record and display fine detail in an image.
The higher the number, the more fine planetary detail that will be visible.
Look for a TV line resolution of 350 and greater.

Being able to manually control the camera's shutter speed and gain is quite useful.
Camera's that have these features set automatically can suffer from overexposed images.
This can happen with a large bright object like the Moon which fills the image frame,
or with a small planetary object like Mars: when there is too much black background the
auto gain overexposes the small disk of the planet.
By manually adjusting these controls, you can vary the amount of incoming light and bring out low
contrast planetary features.  Most of the commercially available astro video cameras
will have these features: (Astrovid, Planetcam, Gallieo, SBIG STV).


Monitors/ TV's:
Monitors and Televisions are basically the same type of analog display machine (NTSC format),
with the difference being that monitors don't have a channel selector or tuner.
Both work differently from a computer monitor, which is a digital machine that displays images
in a digital VGA or SVGA format. (this makes the two technologies incompatible).
The resolution ability of a Monitor/TV is called 'TV Line Resolution'.
Home TV's have a resolution of about 340 lines. (The newer HDTV's are over 480 lines).
Dedicated B&W security monitors have around 350 - 450  TV lines.
B&W sets usually have better resolution, brightness/contrast than color models.
If you're using a B&W camera, it only makes sense to use a B&W monitor.
If your video camera is rated at over 400 TV line resolution, and you're using it with a home TV,
you're losing resolution, which tends to make fine planetary detail blur on the displayed image.


VCR's:
Any VCR  (VHS or Beta) can be used to capture video images from a video camera.
In order to record at the highest resolution, always use the Standard Play ('SP') option for recording.
For the very best quality video, you should consider getting a S-VHS, Hi8, or Beta machine.
These machines record a TV line resolution greater than 400.  (most VHS recorders are 340 TV lines).


Computers:
You can use almost any computer to 'grap' or acquire video images.
Of course it helps to have a fast computer.
You don't want to spend minutes waiting for individual frame captures to process.
If you want to try making real time digital video's, you will need a newer model computer.
Attempting to capture live video at 30 frames per second can bring a computer to it's knees very quickly.


Camcorder on a tripod:
Easiest way of doing video imaging.
Can capture images of the Sun and Moon.
Record eclipses,  and bright meteor trails.
Depending on the camera’s zoom capabilities and
light sensitivity, can capture images of the brighter
constellations, and star clusters.


Camcorder looking thru a telescope:
Can be done by either mounting the camcorder on a tripod and shooting thru the eyepiece,
or handheld to the eyepiece.  Useful way to capture images of the Sun, Moon, and planets.
May have to deactivate the ‘autofocus’ feature of the camcorder.
Images may have a cropped circular look.


Video camera connected to a VCR:
Always connect the camera directly to the VCR first, and connect to the monitor last.
Every additional piece of equipment connected between the recording device and camera will cause
a slight loss of image detail.
Also, you will want to use premium name brand tapes to record on. (not the cheap stuff).
The tape you make your initial recording on is your master tape.  Any time you make a copy,
use the original master tape, as you lose resolution if you make a copy from a copy.


Video camera connected to a Computer:
It helps to have a fast computer
 (200 MHZ >  processor,  64 mb > ram, and a large hard-drive ).
Capturing individual frames can be done using older machines.
(I've used a 486 processor with 16mb ram).
Just remember that the larger the capture frame window size, the more system resources required.
(I've found that a 320 x 240 capture size is a good compromise).
Like VCR's, for the best possible image capture, always connect the camera to the computer first.

There are many different models of graphics cards to choose from.
From a basic WinTV card for about $50, all the way to a deluxe Digital Video (DV) editing card
costing $200 - $300.  The one thing they have in common is that you have to access the inside of
your computer and install the card in an open I/O adapter.
Then you have to install the driver software for your computer’s operating system to be able
to recognize and use the new hardware.
Fortunately, we’re starting to see these cards included as standard hardware on newer computers.

All of the capture cards will come with some type of software that allows you to control
the video interface.  Basic video editing programs will allow you to change and modify
such things as capture window size, capture frame rate, and color settings.
If your not inclined to tinker with the insides of your computer, you can also get external
capture devices.  They  work just like the internal cards, except that they plug into a usb,
or parallel port.

I use a parallel port device called ‘Snappy’.
‘Snappy’ has a nice program interface.  It has a ‘setup’ screen that allows you to set various
video capture options such as the type of capture (single frame or continious), video source,
capture quality, and display mode (single window, multiple new windows, or storyboard).
It also has a ‘Adjust’ screen that allows you to set the video capture window size, and color
quality, and allows you to adjust the brightness/contrast/sharpness of a previewed image.

I could probably do an entire presentation on imaging software.
Just want to mention one of the many possible image processing programs that are available.
This particular one (Adobe PhotoDeluxe) comes bundled with a lot of computers and digital cameras.
It’s actually a ‘lite’ version of Adode Photoshop.
It allows you to perform various enhancements to your photos: such as rotating the images,
resizing/cropping.  You can adjust things like brightness/contrast and color scales.
It lets you save the images in various formats: (gifs, jpegs, bmp’s).
Finally, it lets you print your image various ways.  It’s a good basic image software package.

A great freeware program is  'AstroStack' which allows you to stack or combine multiple images
of the same object. By doing this, you end up with a combined image that has better resolution,
sharpness, and contrast than a single image frame.  Astrostack allows you to load in flatframe and
blackframe corrections, allows you to rate the individual frames that your stacking on their quality,
and will automatically stack the images for you. After the individual images are combined,
you can adjust the combined image by applying an ‘unsharp mask’, adjust the brightness/contrast,
and apply other noise reduction algoryhtms.


Misc Notes:
Using conventional film at prime focus, the Moon easily fits into the entire frame with room to spare.
A small video CCD chip will barely contain a large crater in the image.

Earlier I mentioned that a good feature to have on your camera is manual shutter speed and
gain controls.  Otherwise, you can have problems with overexposure.
You can control overexposure on the autoshutter models by stopping down the aperture of the telescope,
or by using eyepiece filters (variable polarizer) on large bright objects such as the Sun and Moon.
For overexposure problems caused by autogain, try increasing the image scale on the planets by using
a barlow to magnify the planet's disk, decreasing the amount of black sky.
(if you regularly use a diagonal, by placing the barlow before the diagonal, you double its power).

A little trick I learned that helps in finding and centering objects when you're using a video
camera is to set the Monitor brightness/contrast controls at about the half position so you have a
grayish looking screen.  This makes it easier to see dim objects that might be hidden if you have
the brightness/contrast controls set too high.

Another trick that helps in focusing the camera, is to hold an opaque object
(such as a clear plastic eyepiece cap), in front of the focuser drawtube at about the same distance
as where the ccd chip will be when the camera is attached.
You can achieve a rough focus using the opaque material like an eyepiece.
Then simplly insert the camera into the focuser drawtube, and you will be near focus for the camera.

A security camera with a 1/3" video CCD array (average size) mounted at the prime focus of a 8" SCT
will display a magnified image about equal to using a 5mm eyepiece visually.
Adding a barlow further increases the image scale.
This can make locating  objects difficult, unless you're using a larger finder equipped with
crosshairs. An alternative to having a larger finder scope is to use a 'flip mirror' style diagonal.


Conclusion:
The future of video in amateur astronomy is quite bright. (excuse the pun)
Great results can be had with basic video equipment and any type of telescope.
As the consumer electronics market drives down the cost of CCD chips, digital camcorders,
and computers, and as the popularity of digital video (DV) grows, the next few years should see
astrovideography becomming as popular as conventional film and CCD astrophotography.
Eventually the cost of image intensifiers will drop, making real time deep-sky video imaging practical.
Some day we will see amateurs replacing their glass eyepieces with electronic video eyes.
Reccommended Reading: "Video Astronomy" by Steve Massey, Thomas A. Dobbins, and Eric J. Douglass
Reccommended URL's: